Developer Tutorial: SAML Testing using cURL and SSOCheck API
Although we provide the SSOCheck Tool to hide the complexity of SAML testing, this is a tutorial for programmers, admins and testers which should help to understand the usage of the SSOCheck API and how to write SAML tests with simple command line tools like bash and cURL available on most Linux like shells.
The prerequisites for the tutorial are some bash programming skills. The tools used in the tutorial are available on most Linux systems. In addition, we installed “recode” which allows easy conversions of encodings. This is not a must but it makes life easier.
We have split up the tutorial in two parts.
Part I: Develop a script which runs a SAML Browser Profile SSO flow with cURL
Part II: Modify the script to leverage SSOCheck API (API) and run SAML tests
The tutorial uses the public SSOCircle Identity Provider (IDP) and the Fedlet Test Service Provider https://fedlet.idpee.com/sp/ (SP). Although the general approach of the tutorial might work with other Services, we recommend to start with the mentioned provider and then adopt it for your specific services.
Now let’s get started. Before diving into the scripting details we should not lose sight of what we are going to achieve. The picture below depicts the sequence of a SSO use case. That is what our SAML test script (CLIENT) needs to follow:
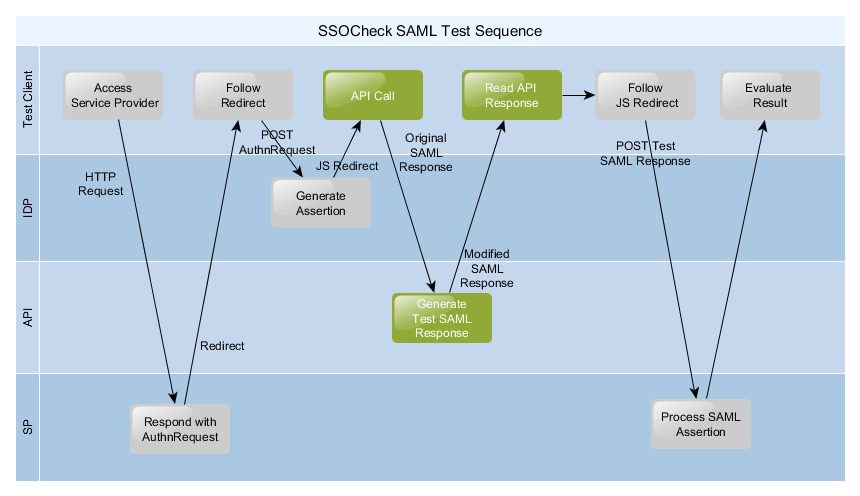
In list form the SSO test flow reads (the acronyms CLIENT, SP, IDP are explained in the chapter above):
- CLIENT accesses the SP (initiate the SSO flow – this is typically a “sign in” button or simply a request to a protected page)
- SP replies with a SAML AuthnRequest message (typically a 302 redirect to the IDP)
- CLIENT follows the redirect and sends the SAML AuthnRequest message to IDP
- If user is not already authenticated with the IDP
- a.IDP redirects to the IDP login page
- b.CLIENT submits credentials via the login form to IDP
- c.IDP authenticates the user and redirects the user to continue with SSO
- IDP generates the SAML Response with the Assertion and sends it back to the CLIENT (typically this is a HTML page with an auto-posted form)
- CLIENT intercepts the auto-posting and sends the SAML Response message to the API
- API modifies the SAML Response message to a SAML TEST message and returns the message to CLIENT
- CLIENT continues posting the SAML Response message to the SP
- SP receives the SAML Response message and authenticates the user based on the Assertion (if SSO is successful the SP typically replies with a “logged in” page or the protected content)
- CLIENT receives the SP response and evaluates whether the SSO flow was successful (user is logged in)
For simplicity step 4 is not shown in the picture above. In Part I of the tutorial our script should run the flow without step 6 and 7. This would be a standard login flow which should end with a successfully signed in user at the SP.
In Part II we will add step 6 and 7 to the script, so that the normal flow becomes a SAML Test flow.